Quick start
- Click here to request a WebPageTest API key.
- Fork the SpeedTracker repository into your own GitHub account or organisation.
- Enable GitHub Pages for the repository under Settings > Options > GitHub Pages. Select the branch you want to serve your site from (typically master).
- Add speedtracker-bot as a collaborator on your repository (under Settings > Collaborators).
- Use the connect tool to establish a connection between SpeedTracker and your repository.
- Edit the main configuration file (
speedtracker.yml). - Edit
_profiles/default.htmlto define your first profile. - Commit and push the changed files.
- Use the test tool to run a test.
It will take a few minutes for the test to be executed and for the results to be uploaded to your repository. After that, go to your GitHub Pages URL to see the results.
Screencast
Table of contents
Introduction
SpeedTracker consists of two separate components: an API layer and a visualisation layer. The former is a Node.js application that processes test requests and handles all communication between you, WebPageTest and GitHub. The latter is a Jekyll running a small React application.
Both these pieces are available as open-source projects, which you can run on your own infrastructure. However, this guide will document the use case of using our hosted API layer, publicly available for anyone to use for free, and hosting the visualisation component on a GitHub repository, served via GitHub Pages.
If you wish to run the API yourself, please refer to the documentation on the GitHub repository.
Prerequisites
SpeedTracker is built on top of WebPageTest. If you don’t have access to a private WebPageTest instance, you can use the public one, for which you will need to request an API key. SpeedTracker will use this key to request tests on your behalf.
Each key comes with a limit of 200 page loads per day, as explained on the link above. You will be subject to the WebPageTest terms of service.
Installation
The first step is to set up a copy of the visualisation layer. To do this, fork the SpeedTracker repository into your own GitHub account or organisation.
SpeedTracker must have push access to your newly-created GitHub repository. To avoid asking you for a Personal Access Token, which would grant us push access to all your repositories, you can simply give push access to our friendly bot on just the repository you created.
To do this, go to the Settings pane on your repository, navigate to Collaborators and add the user speedtracker-bot. At this point, the invitation you just sent is still pending, so you need to prod the bot for it to accept your request.
Use the connect tool for this. Alternatively, open the following link in your browser, replacing the placeholders with your GitHub username or organisation, the name of the repository and the name of the branch you installed the Jekyll site on (typically master or gh-pages):
https://api.speedtracker.org/v1/connect/{USERNAME}/{REPOSITORY}
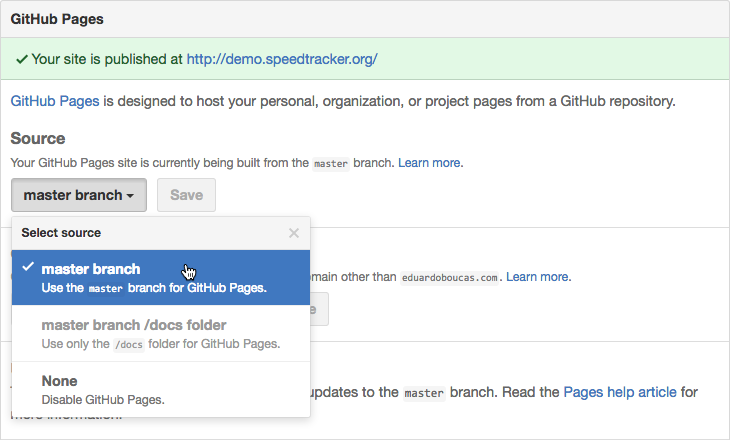
Finally, you need to enable GitHub Pages for your repository. Go to Settings and scroll down to the GitHub Pages section. From there, select which branch you want to serve your site from. From this section, you can also set up a custom domain.
Configuration
SpeedTracker will read from a number of files in your repository, namely speedtracker.yml, the main config file. Since this file will be available for anyone to see (unless your repository is private), we need to protect some of the sensitive information it contains, such as your WebPageTest API key or e-mail address.
To do this, you need to create a key/password that you will use to encrypt any sensitive information. When you make a request to the SpeedTracker API, you’ll need to provide this password as URL parameter. The API will use this to decrypt information as well as to identify you.
The SpeedTracker encryption tool is a small utility to encrypt any given text with a key of your choice. After you come up with a safe password for your site, you can use this tool to encrypt anything with it.
The first thing to encrypt is the key itself, for the encryptionKey parameter in the config. So if your key is foobar123, use that in both the Text and Key fields and you’ll get 0a5f0c0670219dc049. If you want to then encrypt your email address, use [email protected] as the Text and foobar123 as the key and so on.
The table below shows what each configuration parameter is for, and whether or not its contents must be encrypted.
| Parameter | Description | Encrypted |
|---|---|---|
encryptionKey |
Key to be used for encrypting parameters | Yes |
wptKey |
WebPageTest API key | Yes |
alerts |
Channels for performance budget alerts to be delivered on (see alerts) | Partially |
Profiles
Every test runs against a profile, which consists of a pre-defined group of parameters, such as the website URL and other parameters used by WebPageTest, such as connectivity type, location or number of runs.
You can use different profiles to monitor different sites, or simply different variations of the same test (e.g. one profile for a Cable connection, another one for 3G). You need to define at least one profile, so start by editing the existing _profiles/default.html.
The following parameters can be used to configure a profile:
| Parameter | Description | Example |
|---|---|---|
default |
Whether the profile is the default one, loaded on the root path | true |
interval |
Defines an interval (in hours) for the test to be executed (see scheduling tests) | 12 |
name |
Name of the profile | eduardoboucas.com (3G) |
budgets |
Performance budgets | See budgets |
parameters |
WebPageTest test parameters. url is mandatory |
See below |
The parameters key will accept any parameter used by the WebPageTest API. The following block shows how to configure a profile to test https://eduardoboucas.com on a 3G connection, from Dulles, with 1 run and video capture. Only url is mandatory.
Since we’re setting default: true, this will be the main test and will be the one shown when we access our root URL.
---
default: true
name: 'eduardoboucas.com (3G)'
parameters:
  connectivity: '3G'
  location: 'Dulles:Chrome'
  firstViewOnly: true
  runs: 1
  url: "https://eduardoboucas.com"
  video: true
---
Scheduling tests
Recurring tests can be set by defining an interval property within each profile. We currently allow 2 scheduled tests per day, so the minimum value for interval is 12.
You can choose to cancel these at any time by removing the interval property from the profile.
Please note: This feature is still under development. If your scheduled tests stop firing, you might need to request one manually so that it triggers the scheduled ones again.
Alerts
If you define performance budgets, you can choose to receive alerts when any of the metrics goes above its budget. Currently, notifications can be delivered via e-mail or Slack messages.
An alert is defined as an object inside alerts in the main config, where the key is an identifier of the alert. Different alert types have different configuration parameters.
| Parameter | Specific to alert | Description | Encrypted |
|---|---|---|---|
type |
— | Type of the alert (e.g. email) |
No |
recipients |
email |
List of e-mail addresses to receive the alert fo | Yes |
hookUrl |
slack |
Slack webhook URL | Yes |
channel |
slack |
Slack channel | No |
username |
slack |
Username for the Slack bot | No |
iconEmoji |
slack |
Emoji to be used as icon by the Slack bot | No |
For example, the following block would define two alerts, one of type e-mail and another one of type Slack. The following should go in the main config file (speedtracker.yml).
alerts:
  mainAlert:
    type: 'email'
    recipients: ['1q2w3e4r']
  slackAlert:
    type: 'slack'
    hookUrl: 'p0o9o8i7u6y5t4r3e2w1q'
    channel: '#speedtracker'
    username: 'SpeedTracker'
    iconEmoji: ':grimacing:'
Budgets
Performance budgets are defined per-profile, within the profile configuration file, and can monitor any metric used by SpeedTracker. A budget is defined with the following parameters.
| Parameter | Description | Example |
|---|---|---|
metric |
Id of the metric to monitor | firstPaint |
min |
Defines a minimum value for the metric | 900 |
max |
Defines a maximum value for the metric | 90000 |
alerts |
List of alerts to trigger when the budget is overrun. These are the alert identifiers you define on alerts | eduardoboucas.com (3G) |
The following block, extracted from _profiles/default.html, shows how to define a budget of 5s for fullyLoaded, which will trigger mainAlert and slackAlert, as well as a budget of 3s for firstPaint, triggering slackAlert only.
budgets:
  -
    metric: fullyLoaded
    max: 5000
    alerts: ['mainAlert', 'slackAlert']
  -
    metric: firstPaint
    max: 3000
    alerts: ['slackAlert']
Run a test
With everything configured, we can finally request a test. You can use the UI on https://speedtracker.org/test, or alternatively fire a GET or POST request to the following URL, replacing the placeholders with your GitHub username or organisation, the name of the repository, the branch, the id of the profile and the encryption key, respectively.
https://api.speedtracker.org/v1/test/{USERNAME}/{REPOSITORY}/{BRANCH}/{PROFILE}?key={KEY}
You can use this URL to request tests programatically. For example, you can use it as a post-commit webhook on GitHub, so that your website is tested every time you make a deployment.
Please note that your test will be added to a queue, so it may take some time for the new result to be shown on your visualisation layer.